導航欄
導航欄位於最上方,建立選項設定可點擊的連結,電腦版就是固定在上方,行動版要點擊左上方選單才會出現,導航欄依序由左至右分別為LOGO、標題、docs、blog、連結和光暗主題切換。
開始設定
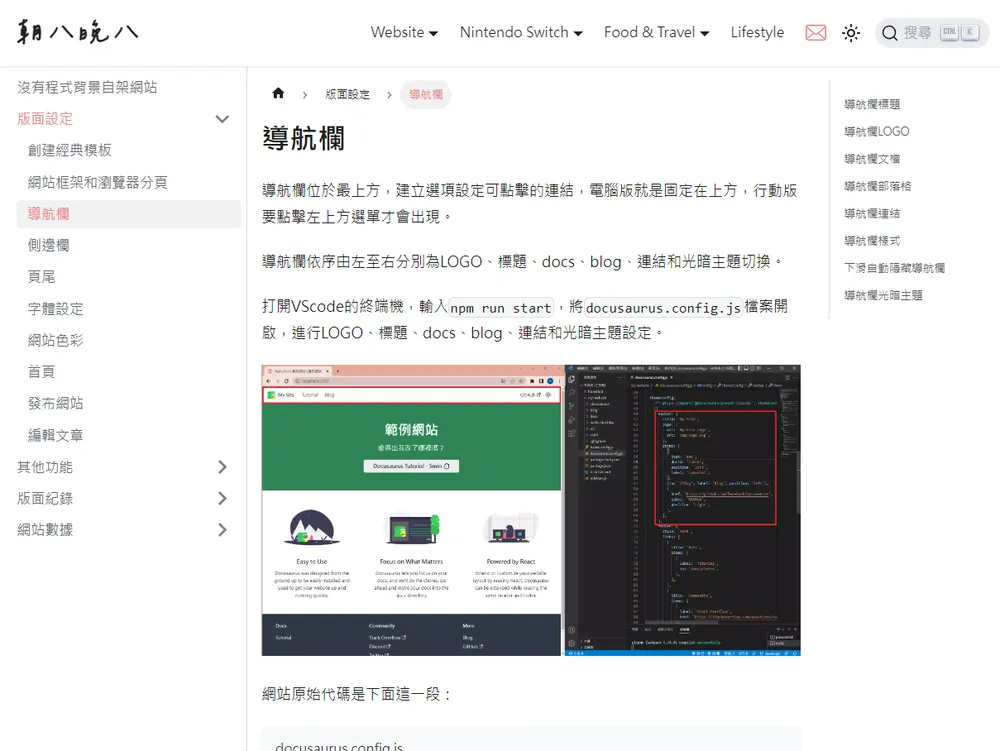
打開VScode的終端機,輸入npm run start,將docusaurus.config.js檔案開啟,進行LOGO、標題、docs、blog、連結和光暗主題設定。
網站原始代碼是下面這一段:
themeConfig:
/** @type {import('@docusaurus/preset-classic').ThemeConfig} */
({
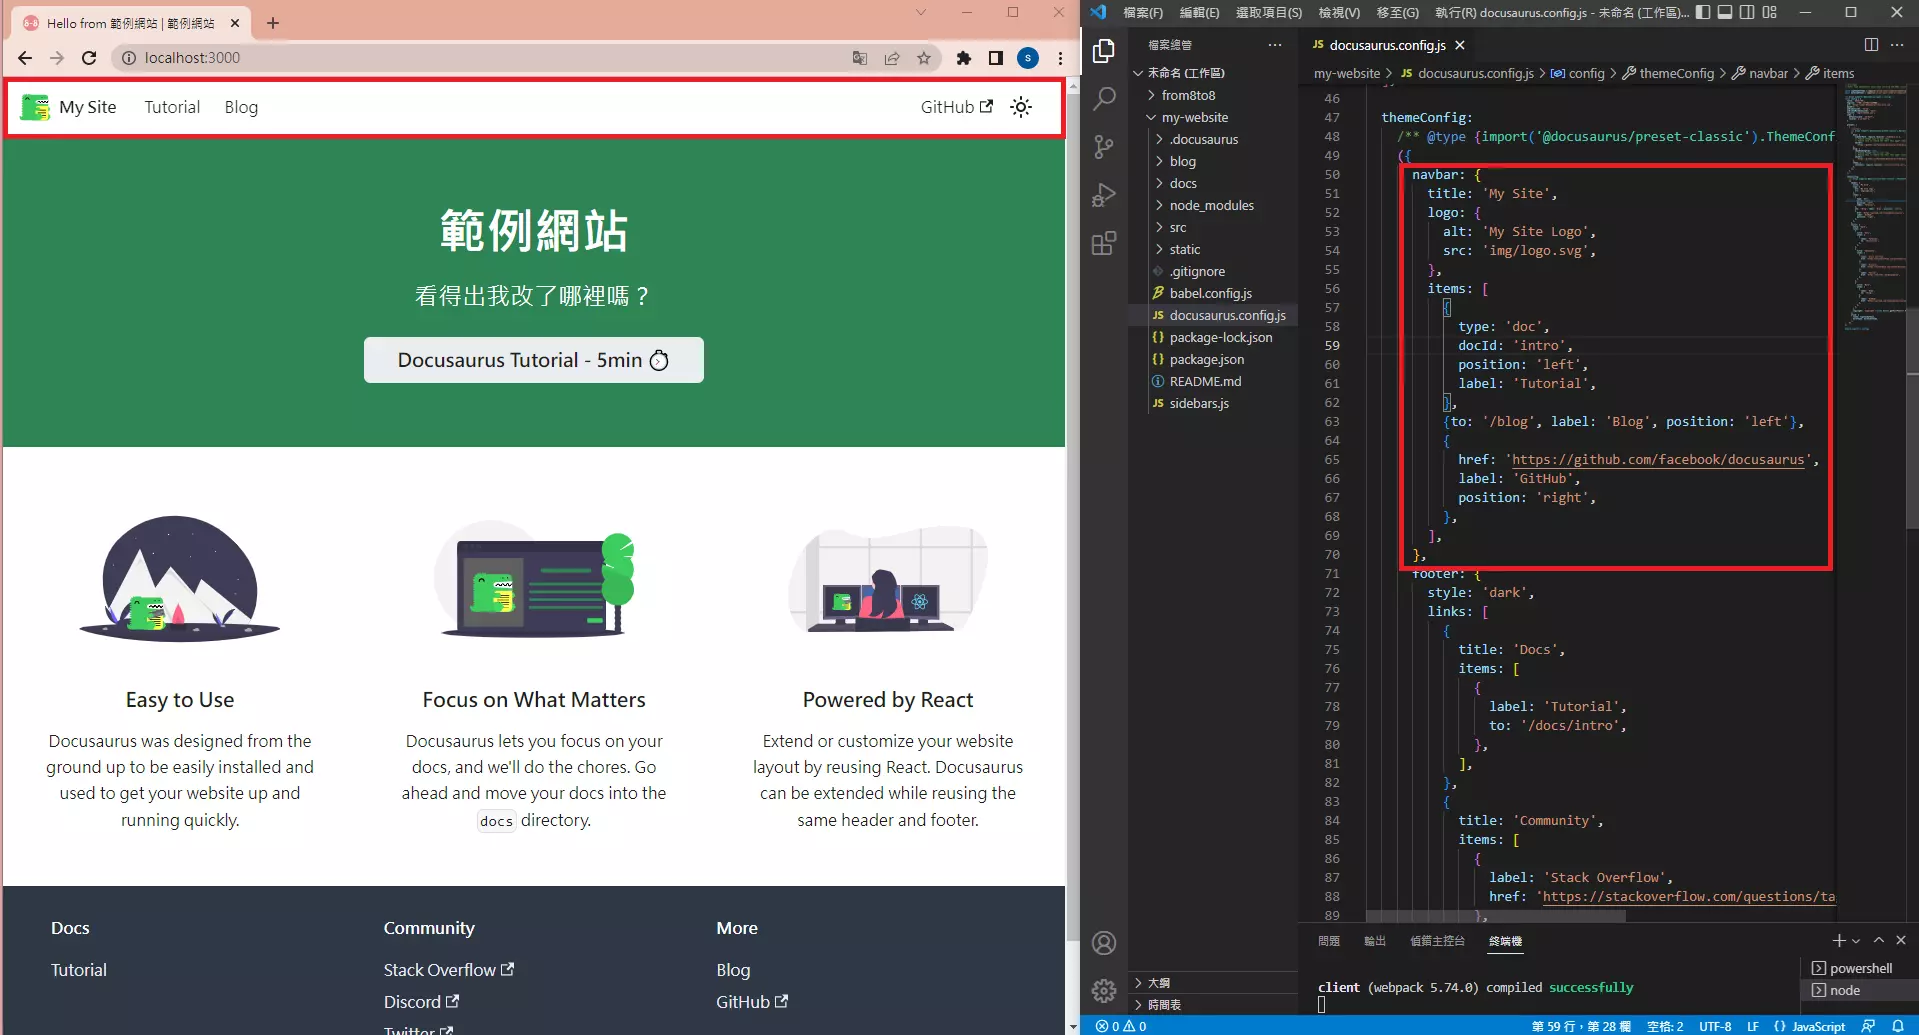
navbar: {
title: 'My Site',
logo: {
alt: 'My Site Logo',
src: 'img/logo.svg',
},
items: [
{
type: 'doc',
docId: 'intro',
position: 'left',
label: 'Tutorial',
},
{to: '/blog', label: 'Blog', position: 'left'},
{
href: 'https://github.com/facebook/docusaurus',
label: 'GitHub',
position: 'right',
},
],
},},)
導航欄標題
導航欄標題通常會更改成網站名稱,預設是點擊後會到首頁。
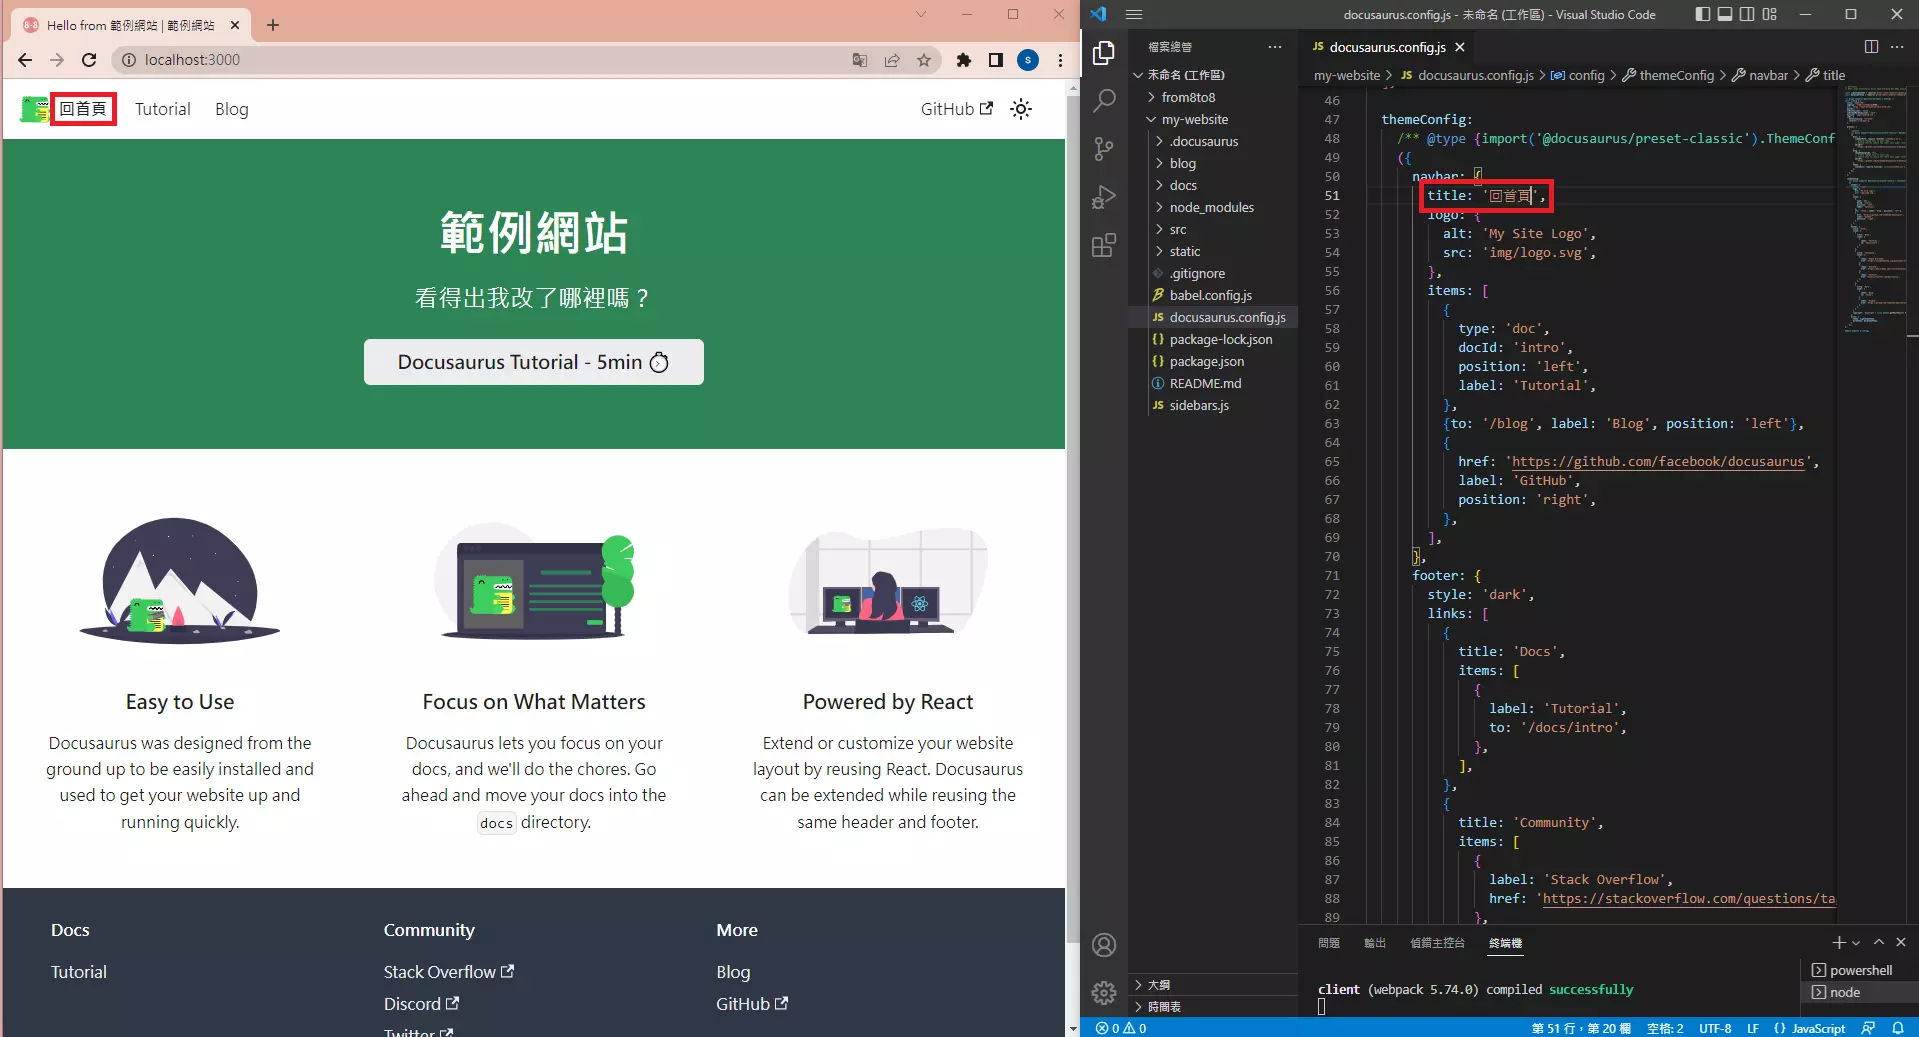
  themeConfig:
    ({
      navbar: {
        title: '回首頁',
        ...
      },
    },)
更改網站標題字體請看字體設定,再調整字體大小。
.navbar__title{
  font-family: '辰宇落雁體';
  font-size: 30px;
}
不想顯示標題就在docusaurus.config.js直接選取後Ctrl + /。
  themeConfig:
    ({
      navbar: {
        // title: '回首頁',
        ...
      },
    },)
導航欄LOGO
LOGO設定alt為圖片失效時替代的文字敘述,LOGO製作方法及放置位址同網站圖標(favicon),然後設定src路徑。
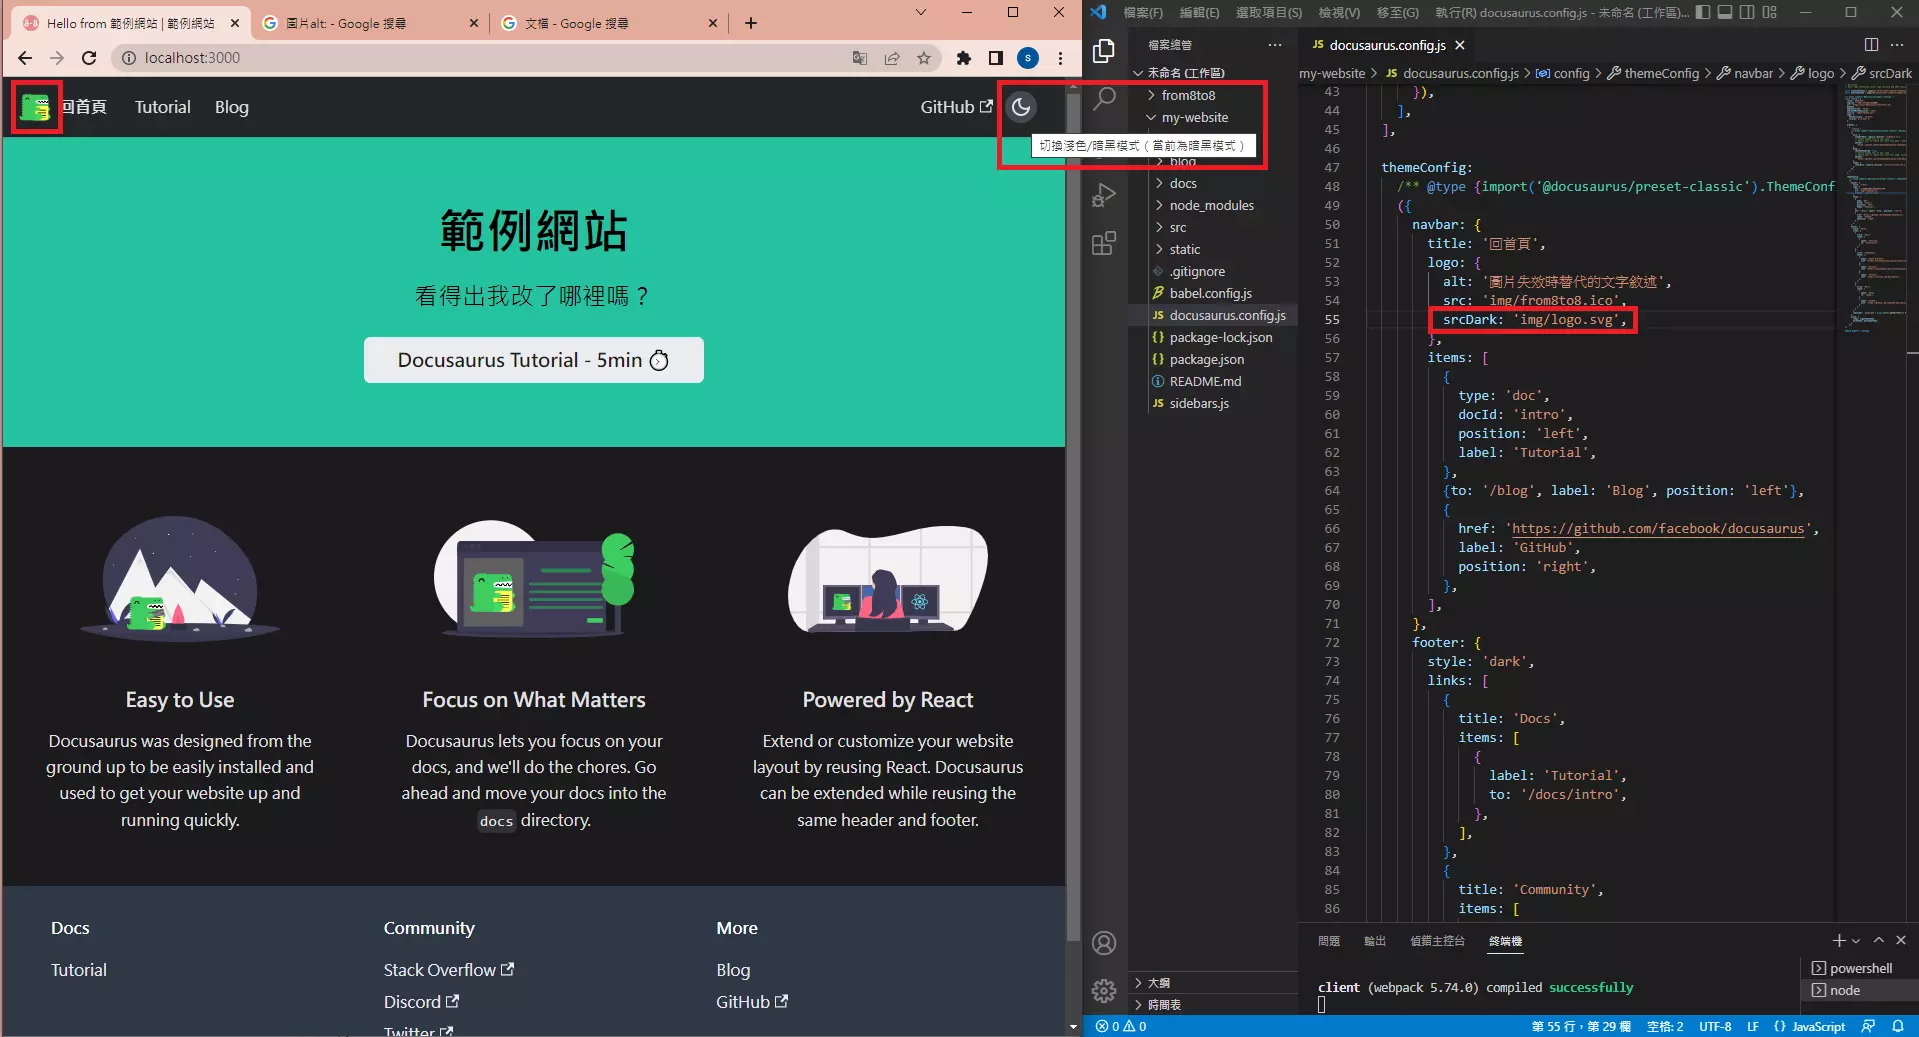
如果想要暗黑模式下改變LOGO,就將想要改變的LOGO路徑放在srcDark,長寬設置成一樣。
  themeConfig:
    ({
      navbar: {
        title: '回首頁',
        logo: {
          alt: '圖片失效時替代的文字敘述',
          src: 'img/from8to8.ico',
          srcDark: 'img/logo.svg',
          width: 32,
          height: 32,
        },
      },},)
LOGO設定alt為圖片失效時替代的文字敘述。
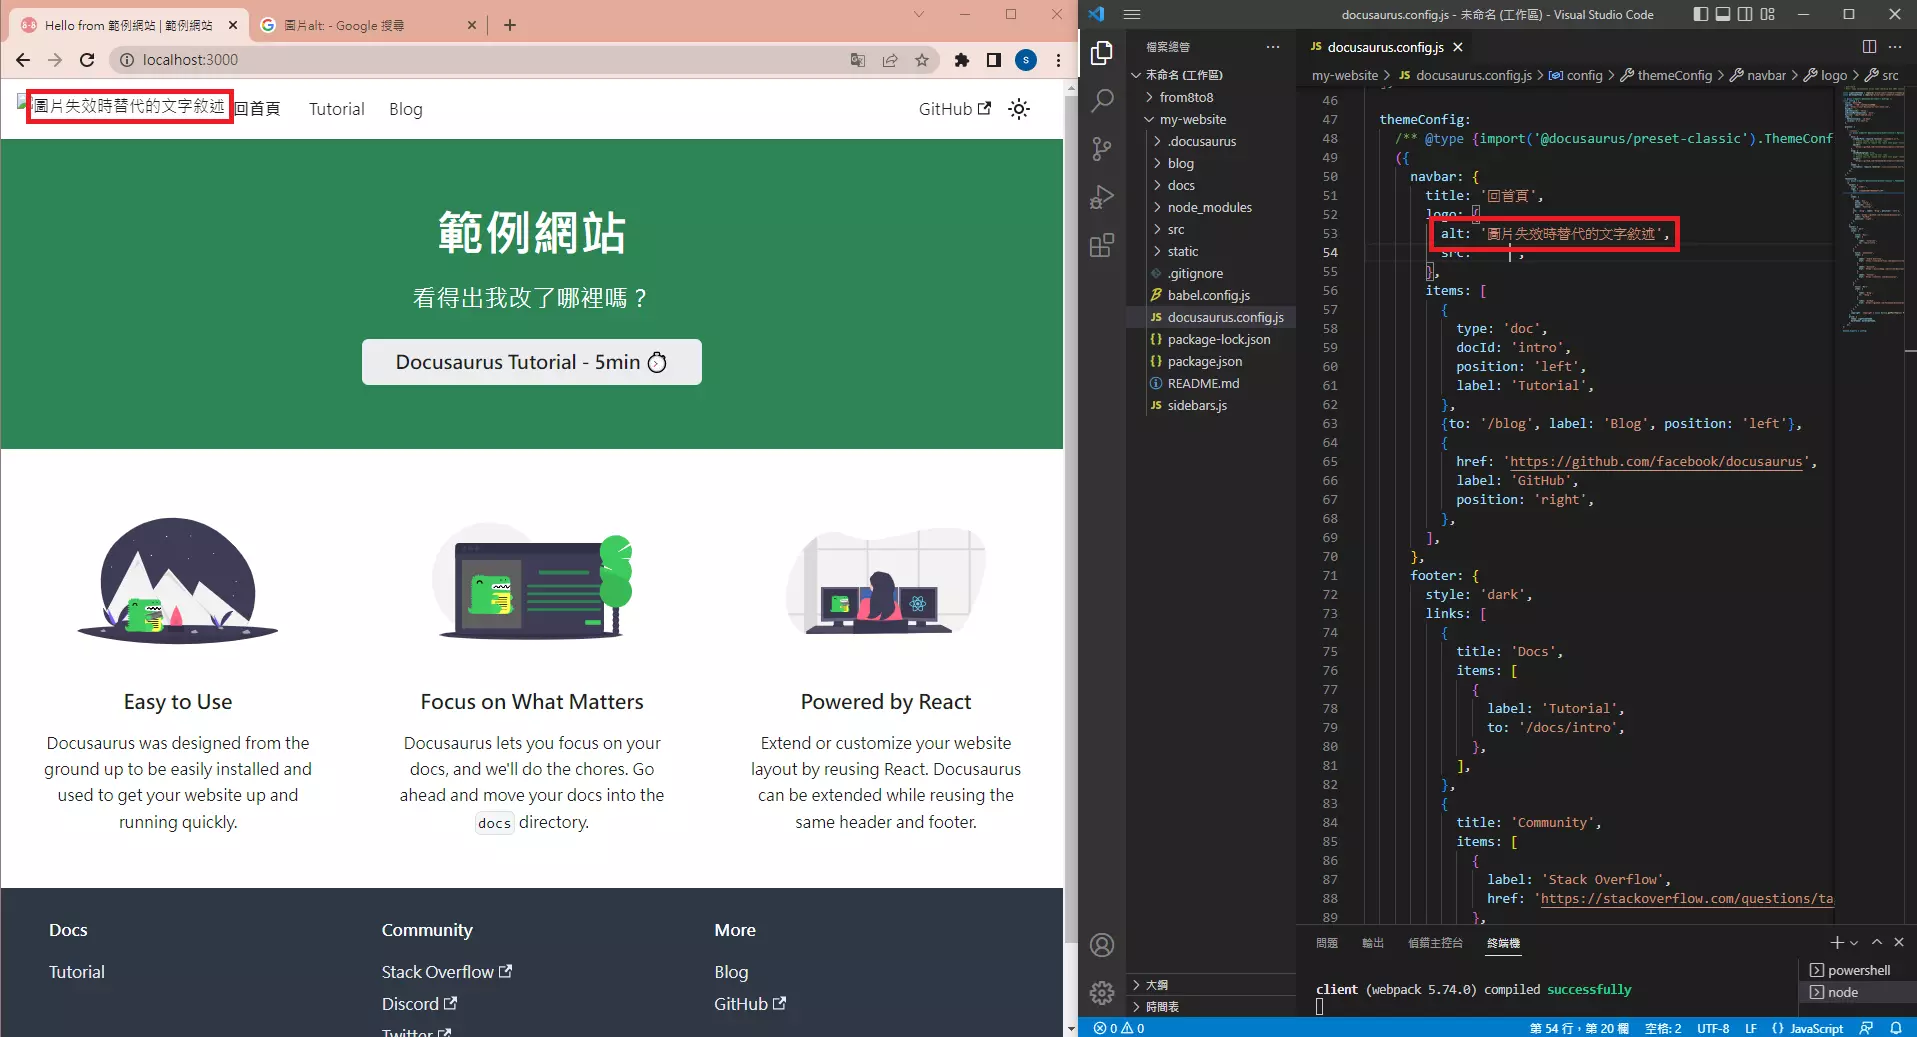
LOGO圖案設定。

LOGO在暗黑模式下改變圖案。
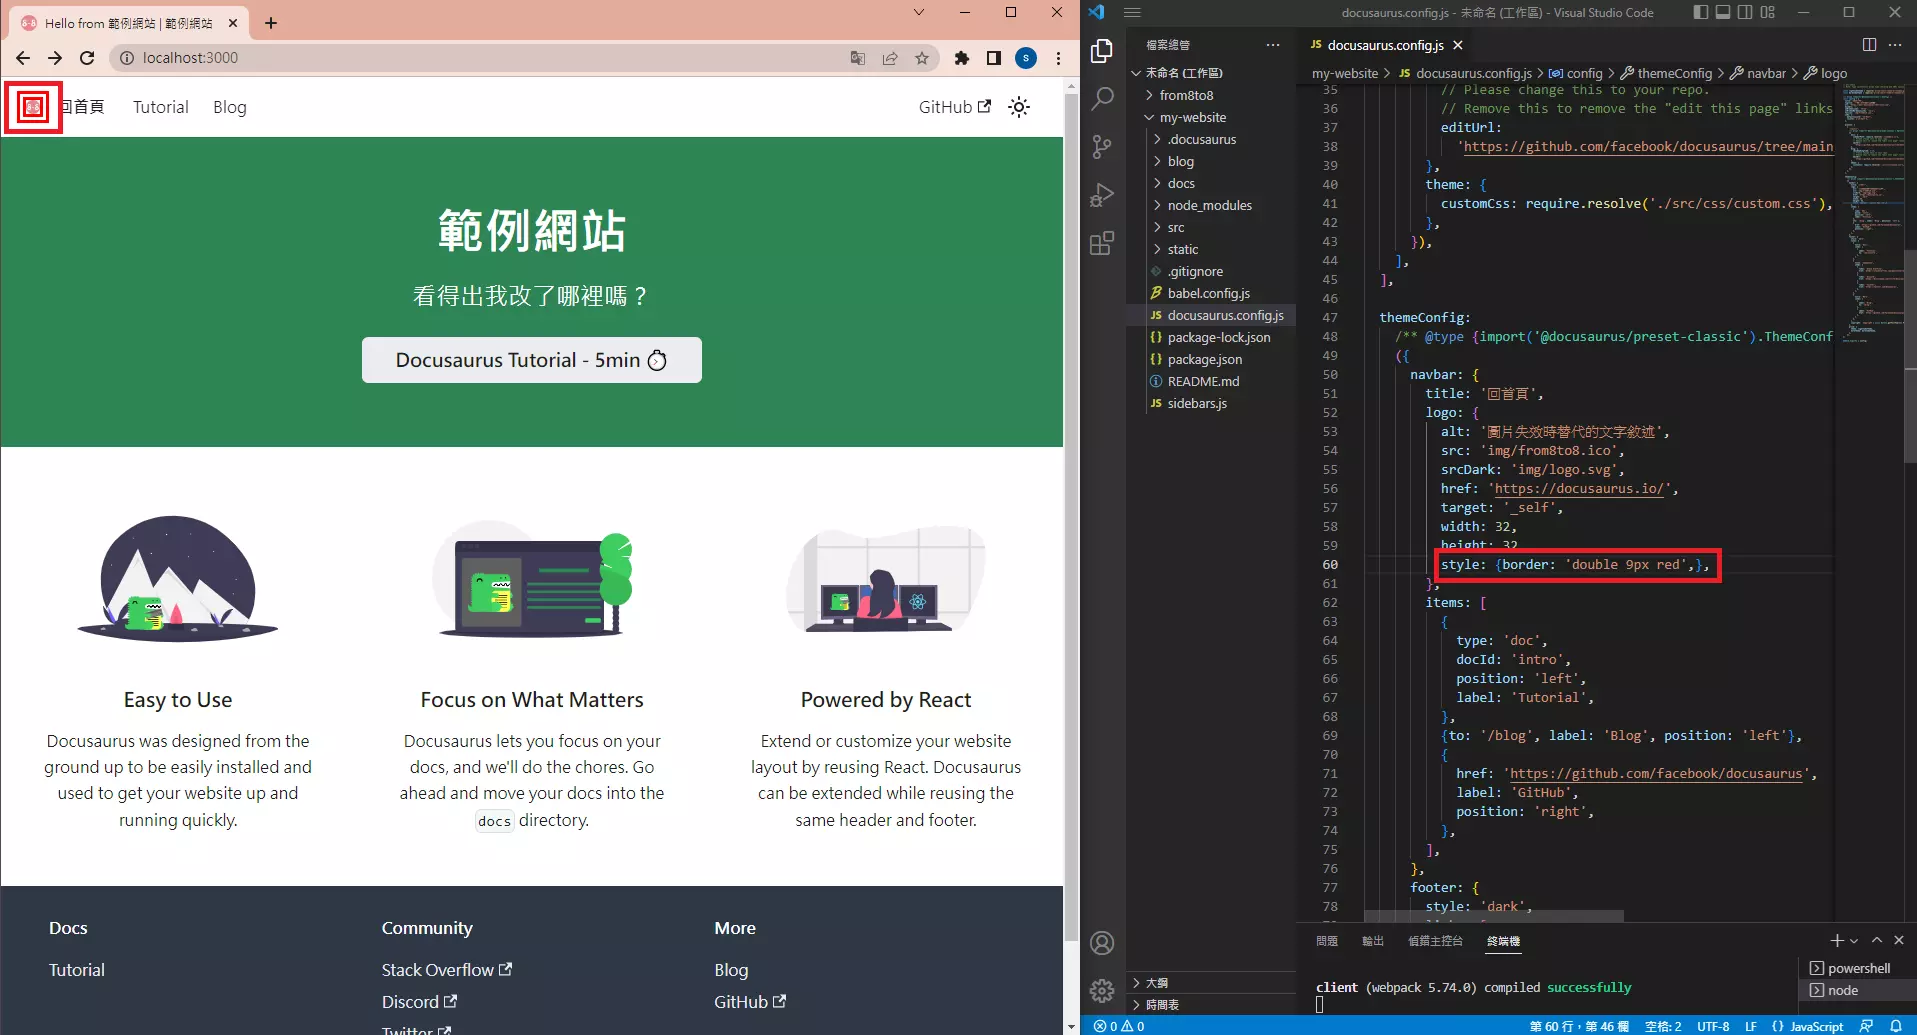
可以針對LOGO設定樣式凸顯。
    navbar: {
    title: '回首頁',
    logo: {
        style: {border: 'double 9px red',},
    },
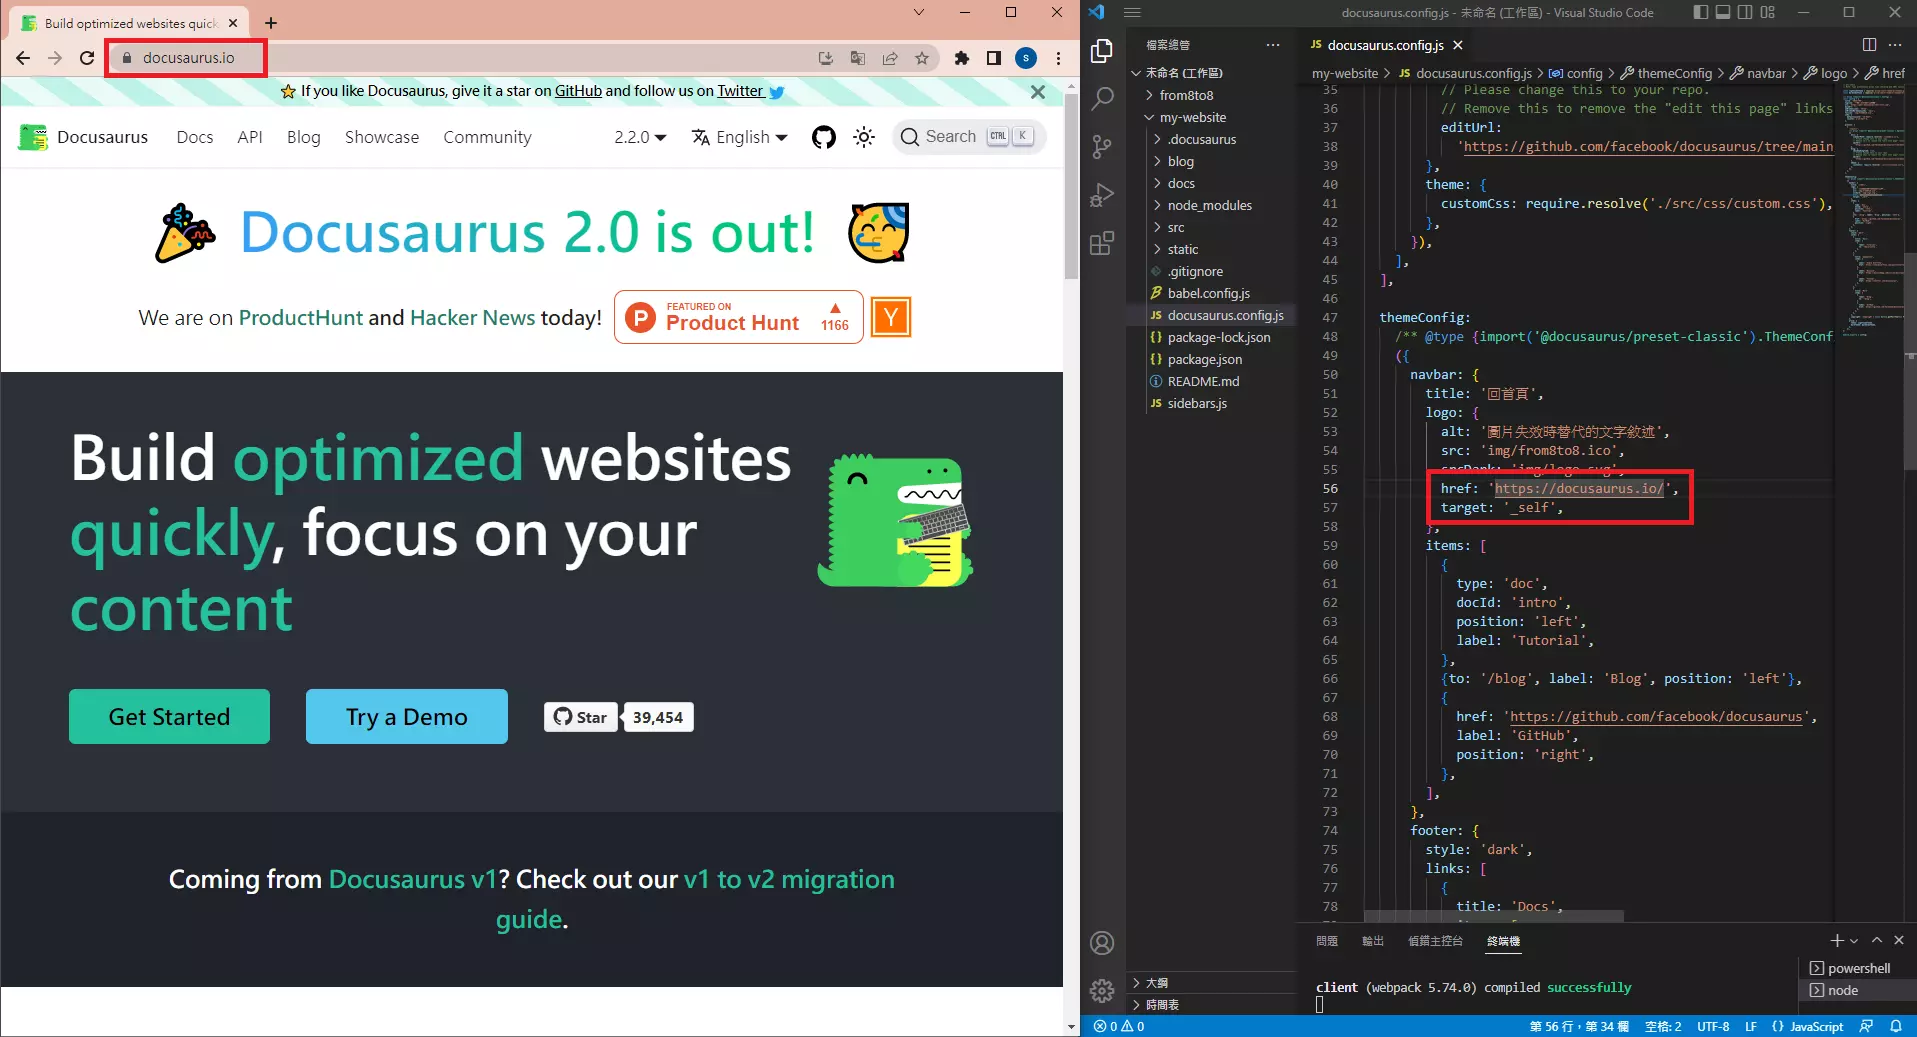
可以將原本預設點擊後到首頁,更改為頁面跳轉到外部連結指定網址。
  navbar: {
    title: '回首頁',
    logo: {
      href: 'https://docusaurus.io/',
      target: '_self',
    },}
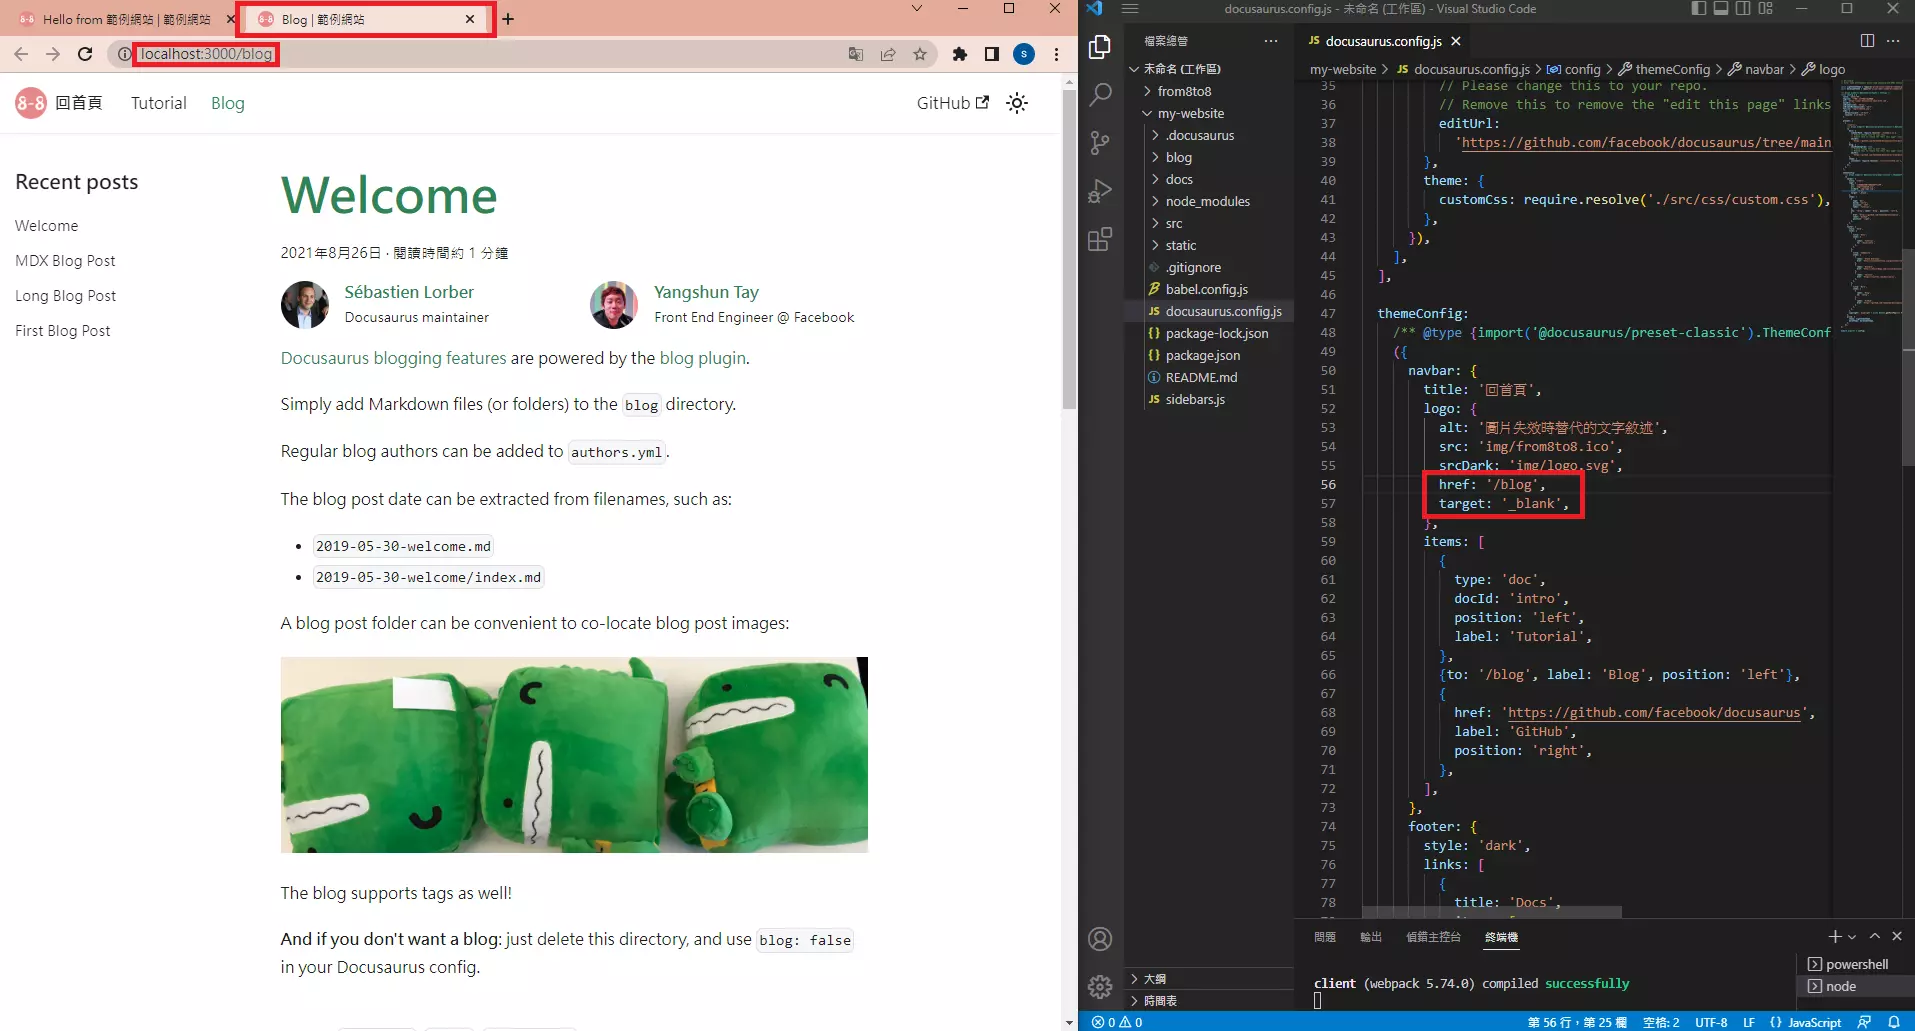
也可以將原本預設點擊後到首頁,更改為另開分頁到內部連結指定位置。
  navbar: {
    title: '回首頁',
    logo: {
      href: '/blog',
      target: '_blank',
    },}
不想顯示LOGO就在docusaurus.config.js直接選取後Ctrl + /。
導航欄文檔
更改文檔在導航欄的位置,以及在導航欄顯示的名稱。
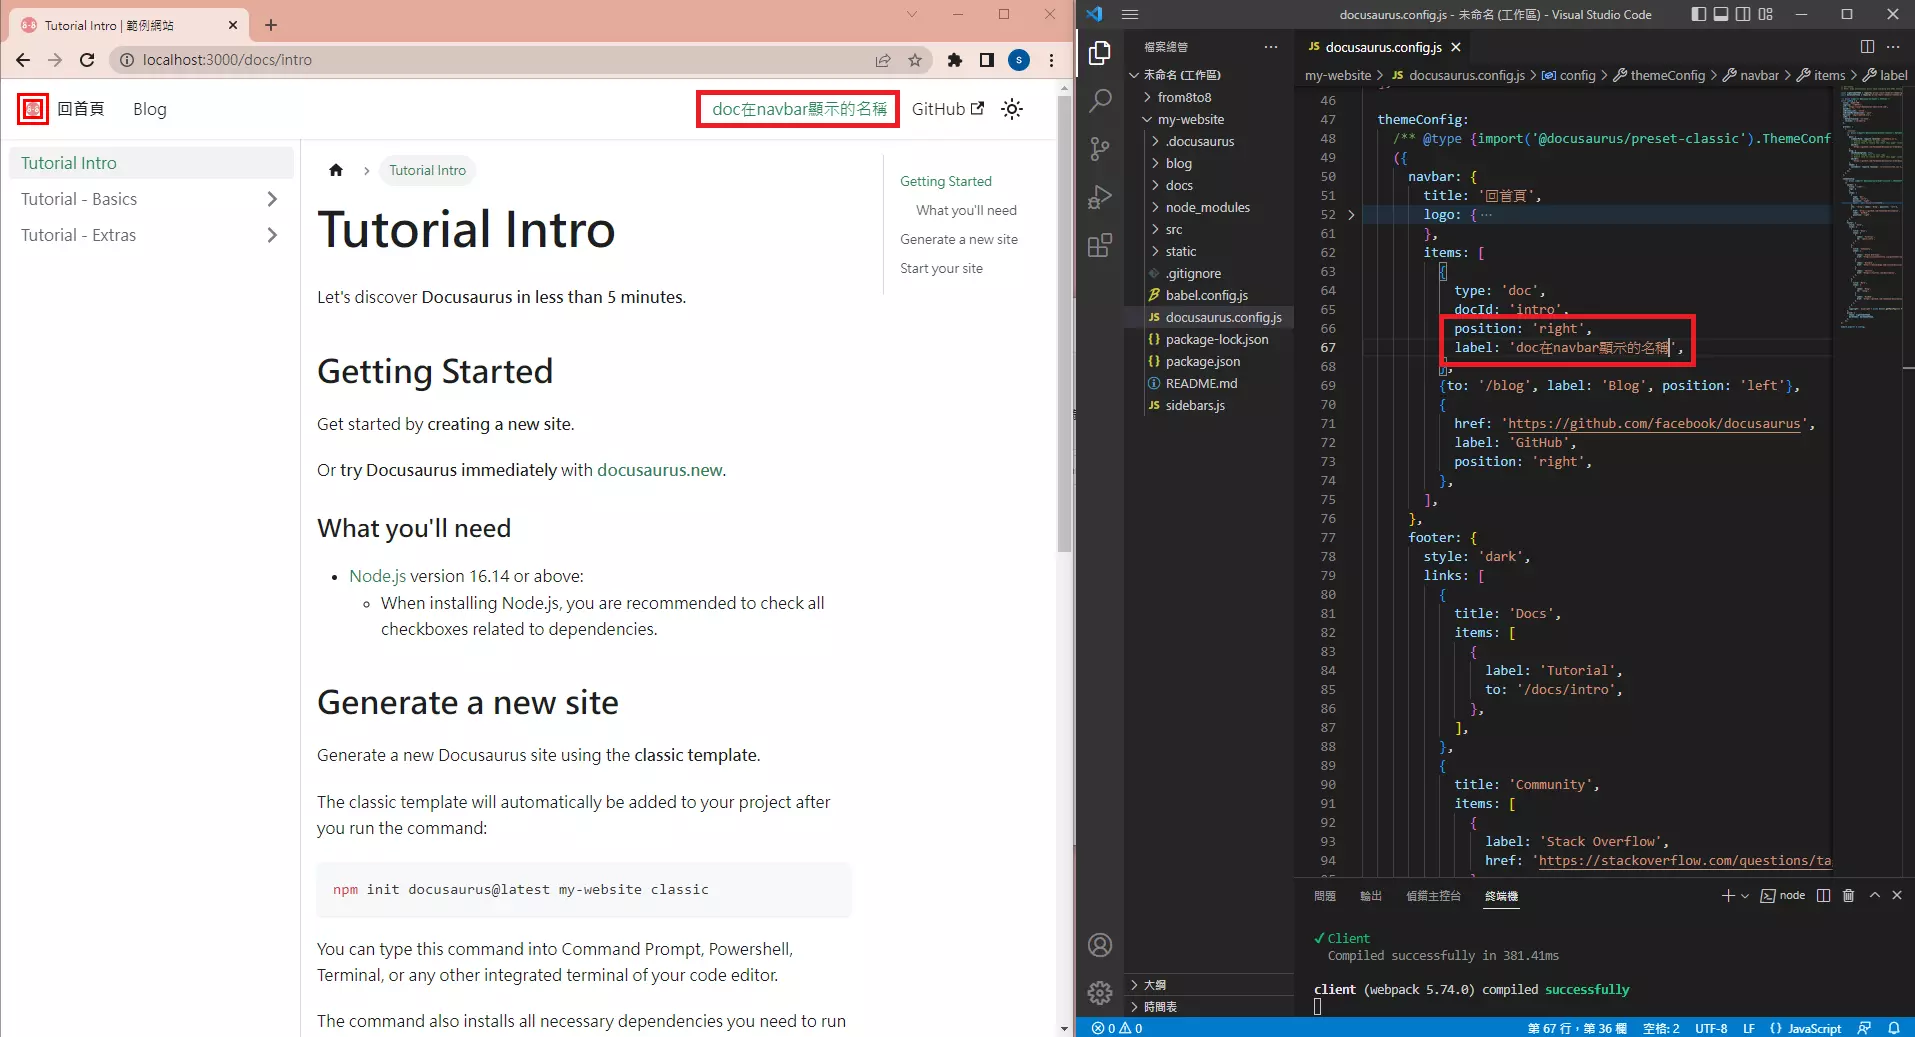
themeConfig:({
    items: [
        {
        type: 'doc',
        position: 'right',
        label: 'doc在navbar顯示的名稱',
        },
    ],
},)
更改文檔為下拉式選單。

themeConfig:({
  items: [
    {
      type: 'dropdown',
      position: 'right',
      label: 'doc在navbar顯示的名稱',
      items: [
        {
        label: 'Tutorial Intro',
        to: '/docs/intro',
        },
        {
        label: 'Tutorial - Basics',
        to: '/docs/category/tutorial---basics',
        },
      ]
    },
  ],},)
導航欄部落格
和文檔一樣,可以更改部落格在導航欄的位置,以及在導航欄顯示的名稱。
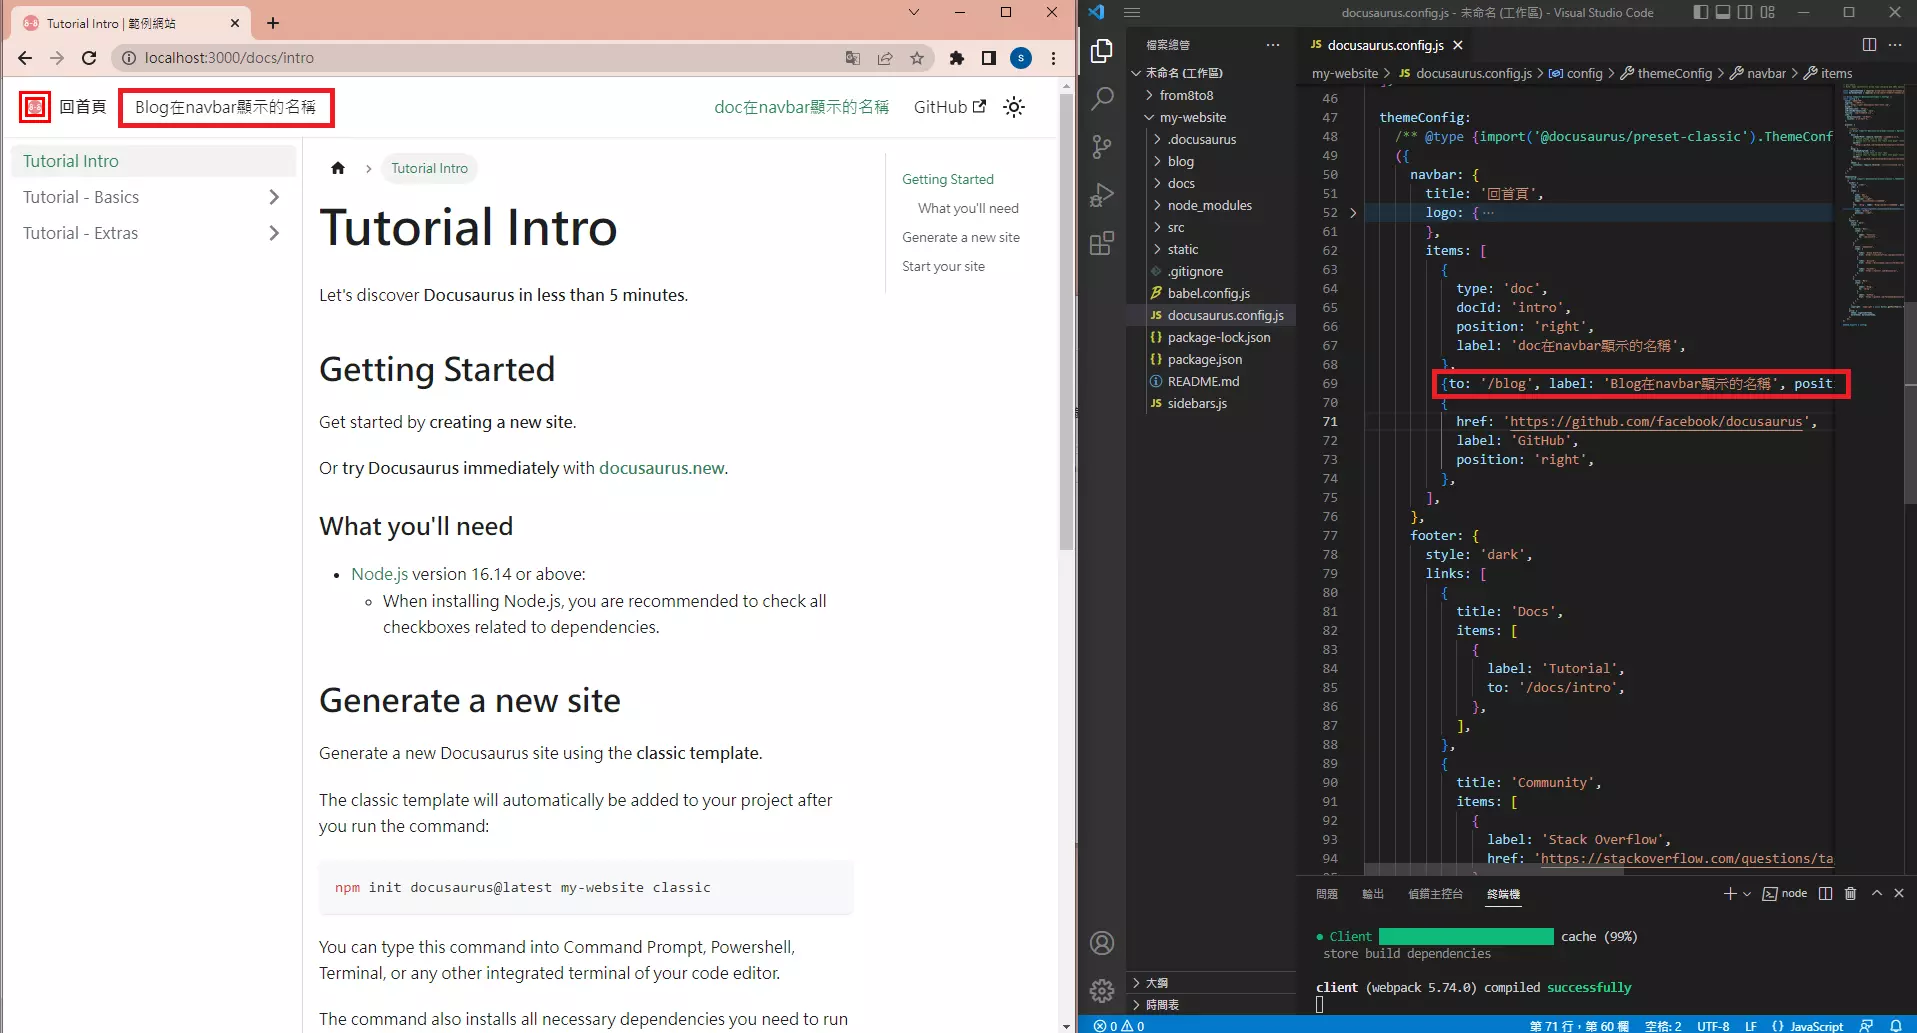
themeConfig:({
  items: [
    {to: '/blog', label: 'Blog在navbar顯示的名稱', position: 'left'},
  ],
},)
導航欄連結
和文檔及部落格一樣,可以更改連結在導航欄的位置,在導航欄顯示的名稱,以及連結網址。
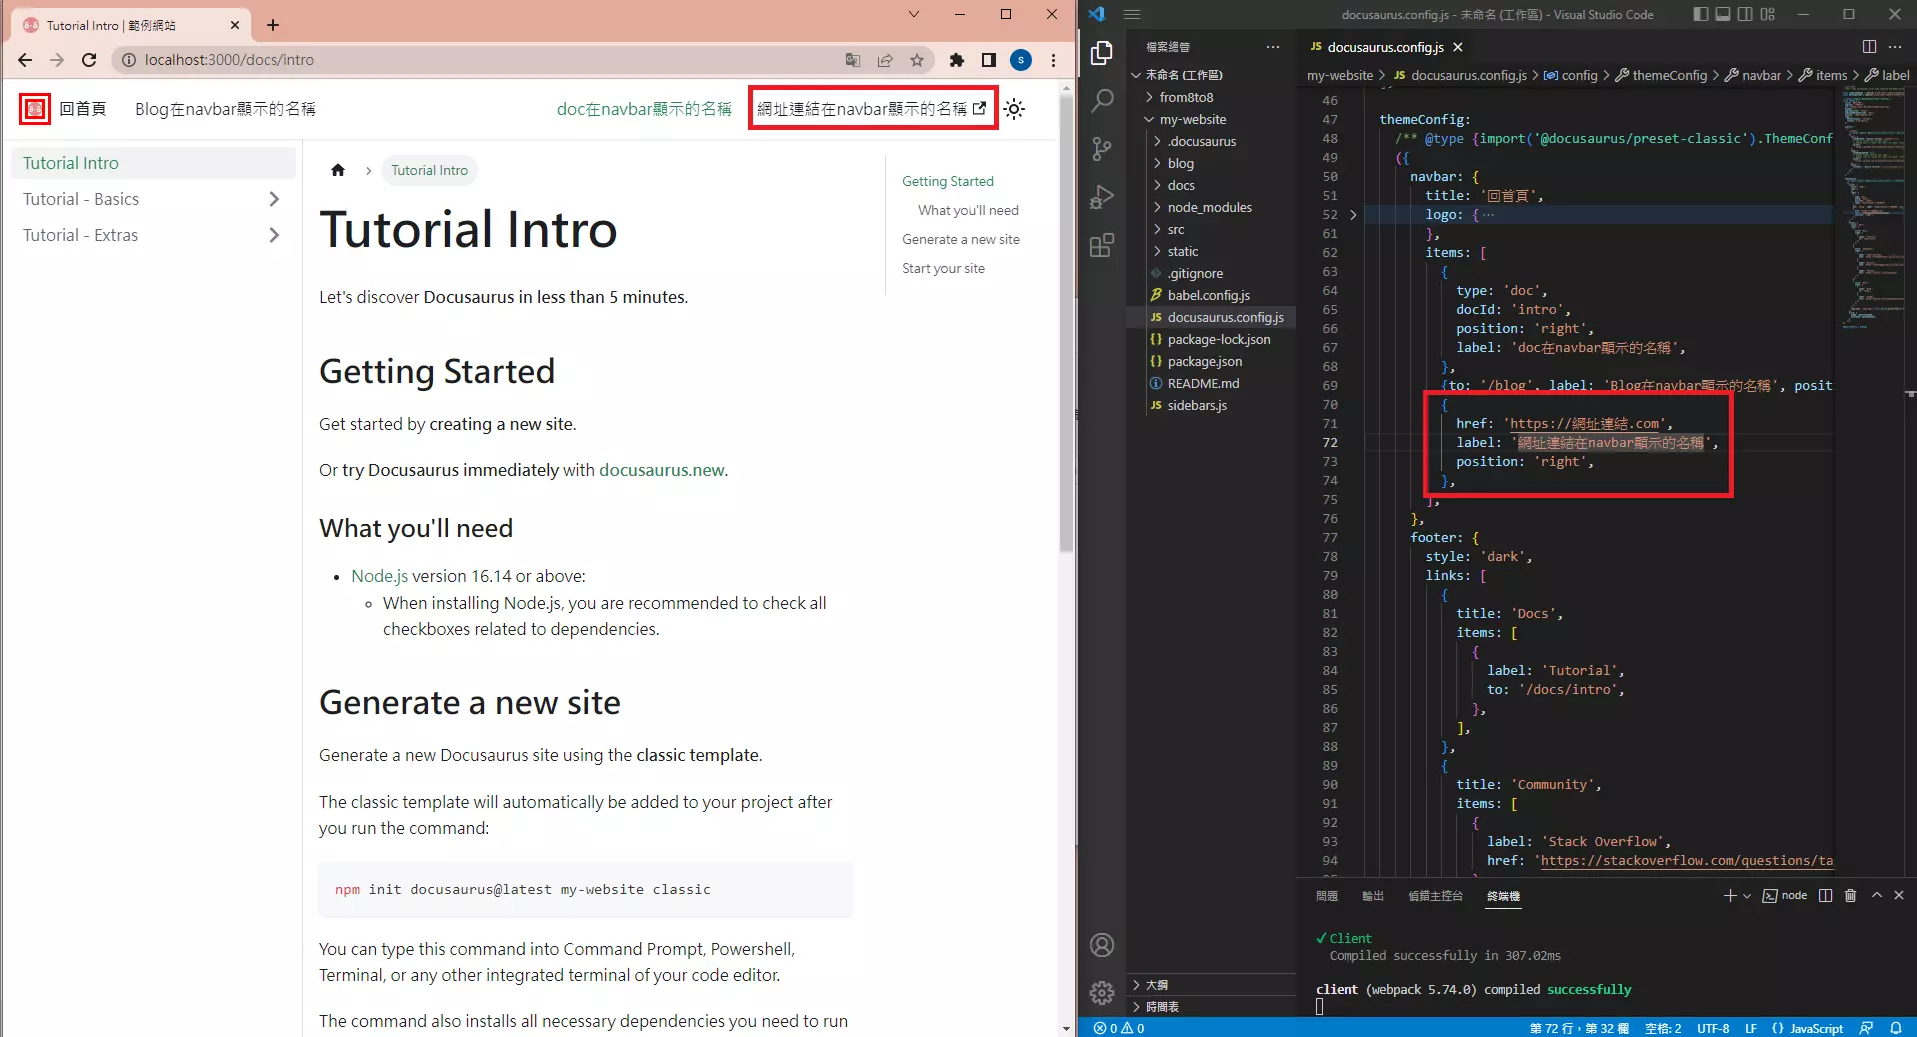
themeConfig:({
  items: [
    {
    href: 'https://網址連結.com',
    label: '網址連結在navbar顯示的名稱',
    position: 'right',
    },
  ],
},)
下滑自動隱藏導航欄
自動隱藏導航欄,在網頁下滑時會將導航欄隱藏,向上滾動時導航欄自動出現。
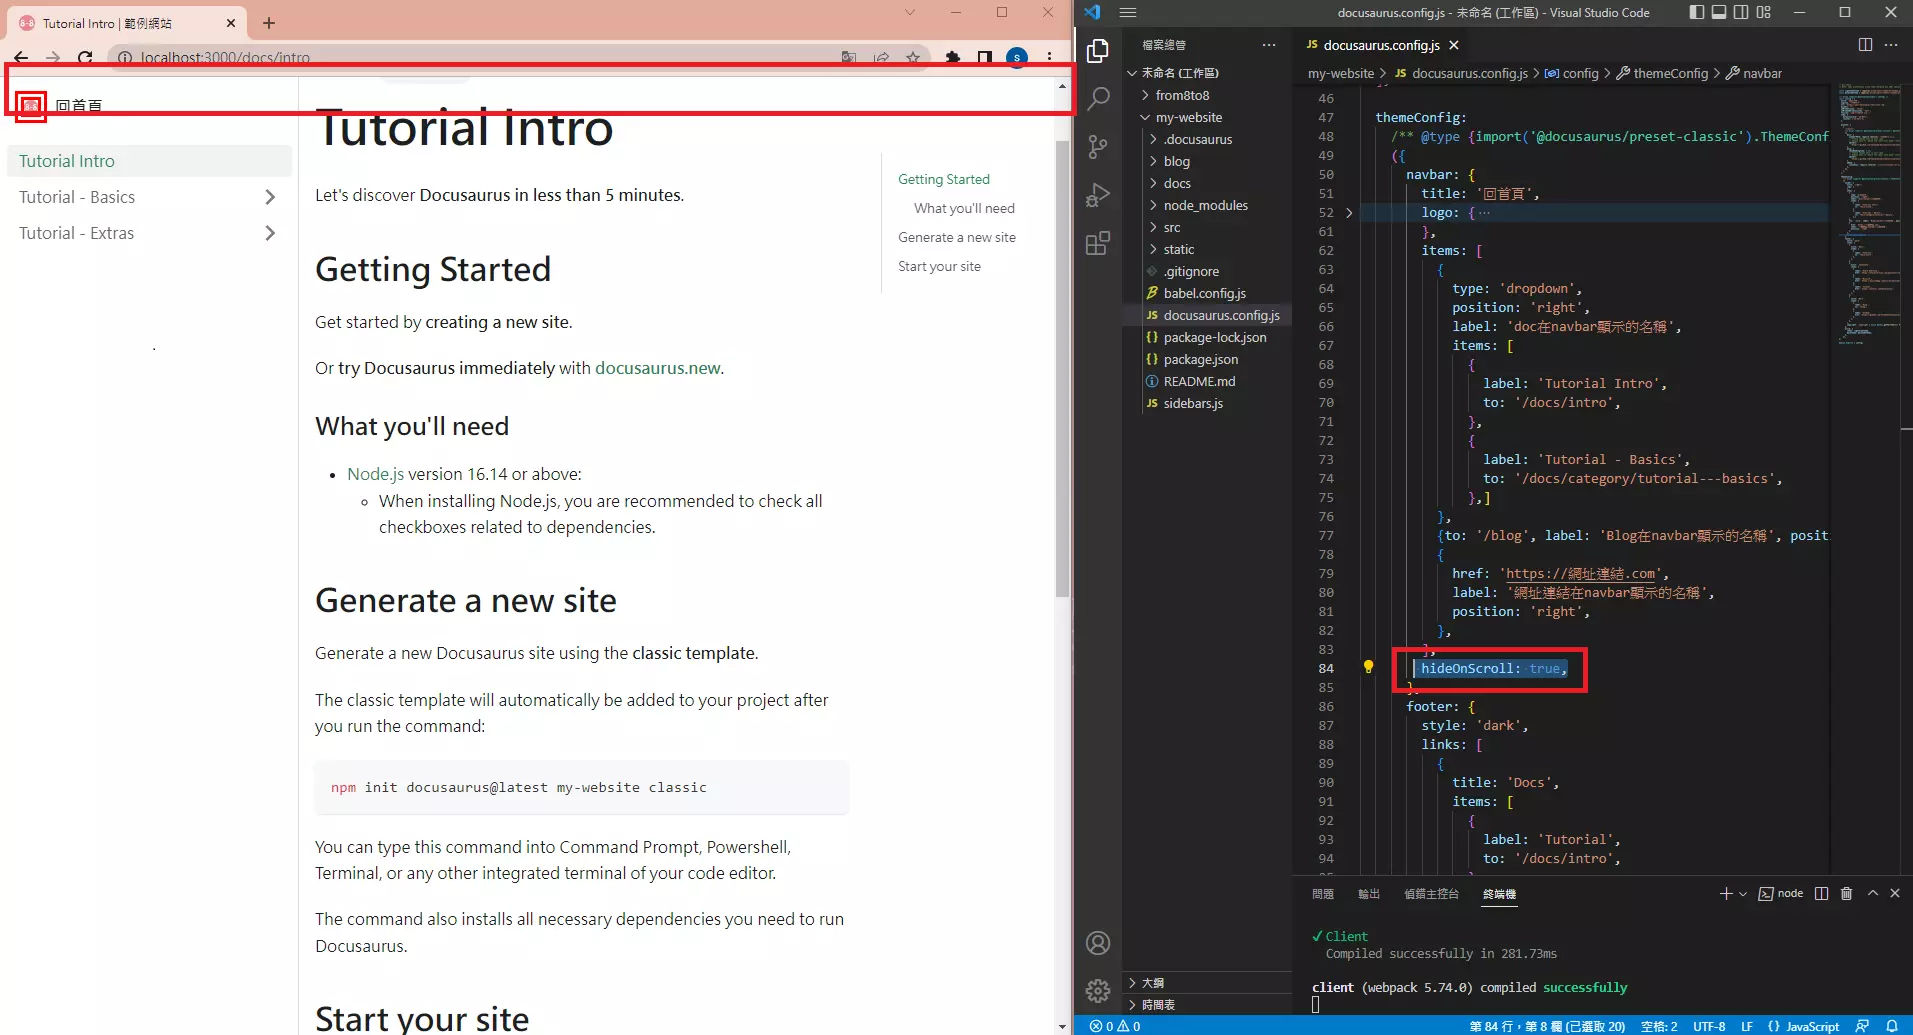
  themeConfig:
    ({
      navbar: {
        title: '回首頁',
        logo: {...},
        items: [...],
        hideOnScroll: true,
      },
    }),
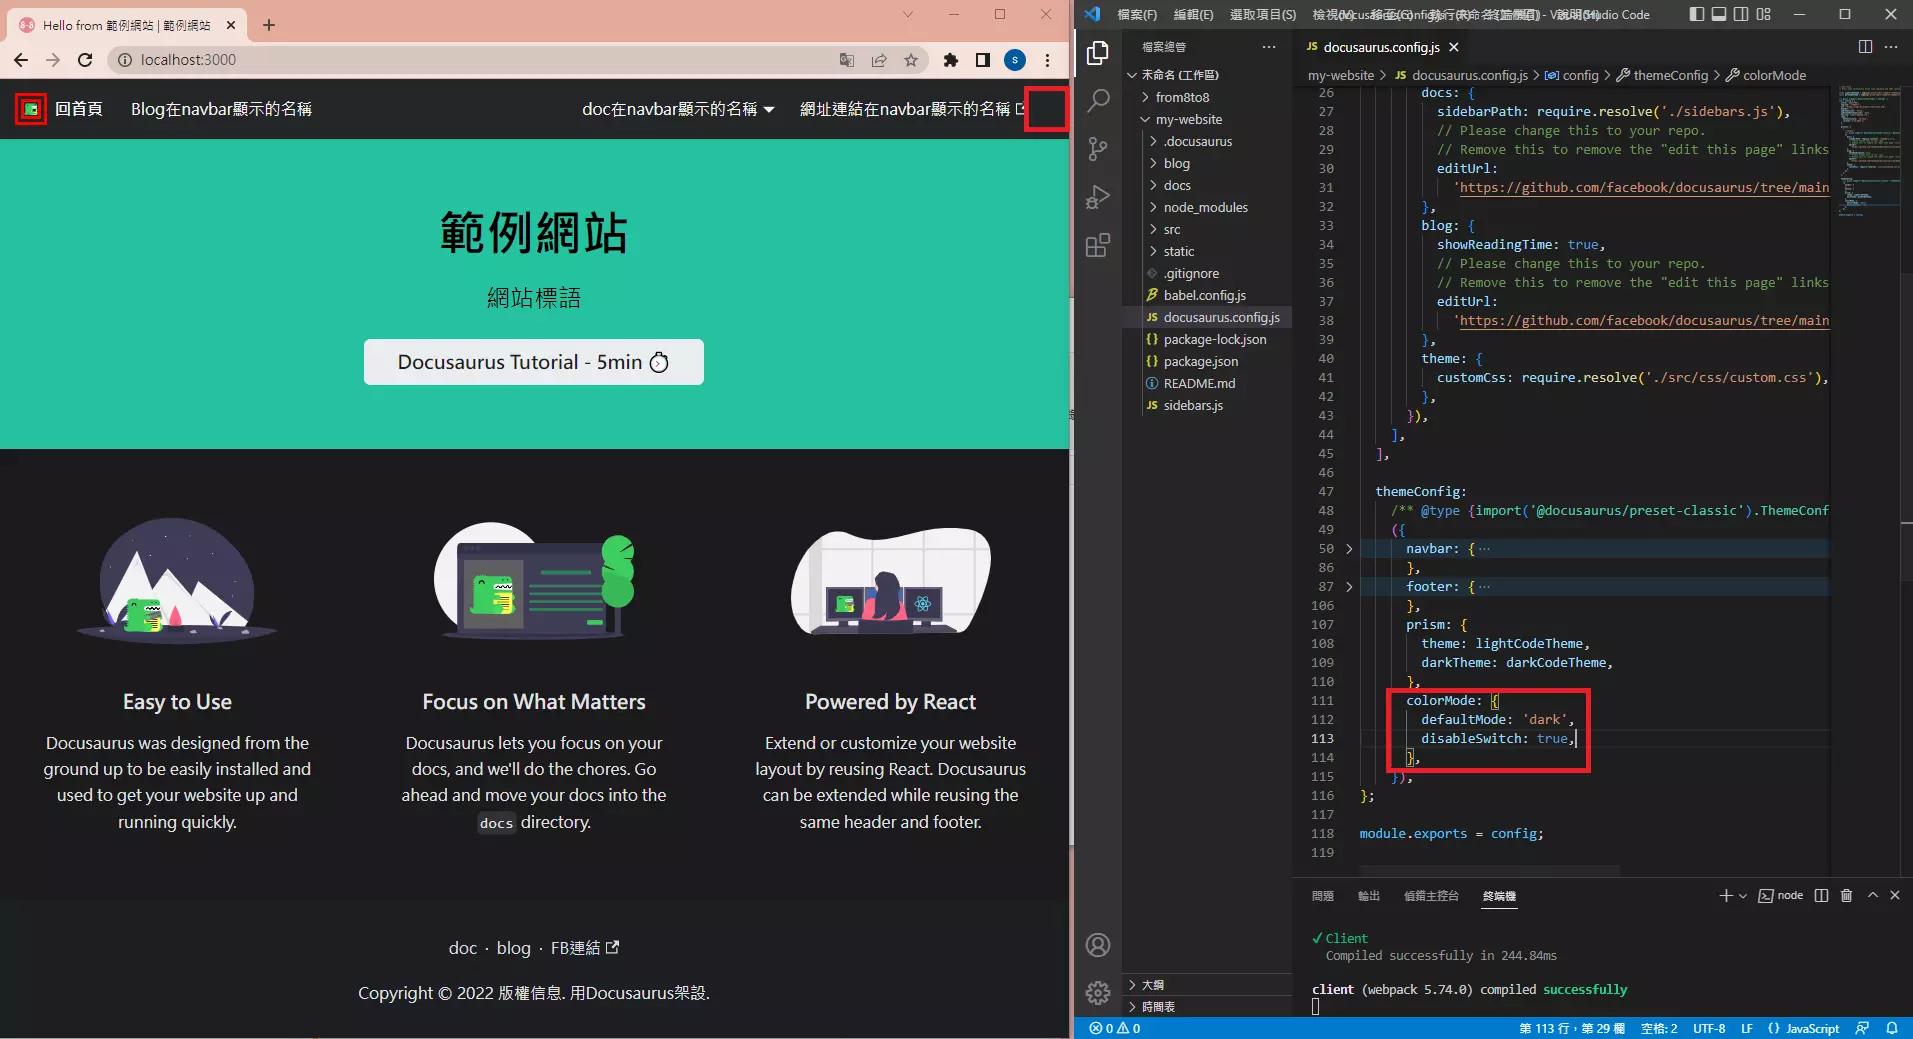
導航欄淺色/暗色模式
如果比較喜歡暗色模式,可以設定首次訪問網站時的色彩模式為暗色。
  themeConfig:
    ({
      navbar: {},
      ...
      colorMode: {
        defaultMode: 'dark',
        disableSwitch: false,
      },
    }),
};
如果只想要有一種色彩主題,不想要有光暗切換,設定首次訪問網站的色彩模式後,將光暗模式切換按鈕隱藏。
  themeConfig:
    ({
      navbar: {},
      ...
      colorMode: {
        defaultMode: 'dark',
        disableSwitch: true,
      },
    }),
導航欄樣式
Right Navigation
閱讀習慣由左至右,由上而下,因此在部落格中最常見的樣式,是將網站logo和title放在導航欄最左側,是最容易被人看到的位置。
設置方法很簡單,就是把title、logo設置好,將position全部改為right。
themeConfig:
/** @type {import('@docusaurus/preset-classic').ThemeConfig} */
    ({
      navbar: {
        title: '朝八晚八',
        logo: {
          alt: 'My Site Logo',
          src: 'img/logo.webp',
        },
        items: [
          {
            type: 'dropdown',
            position: 'right',
            label: 'Website',
            items: [...],
          },
          {
            type: 'dropdown',
            position: 'right',
            label: 'Website',
            items: [...],
          },
          {
            type: 'dropdown',
            position: 'right',
            label: 'Food & Travel',
            items: [...],
          },
          {to: '/diary', label: 'Lifestyle', position: 'right'},
         ],
       },
    })
Split Navigation

將title、logo設置在導航欄正中央,將項目一分為二,這也是在部落格中常見的樣式,主要是強調網站標誌,加深印象。
原始碼在這裡。
import React, {type ReactNode} from 'react';
import {useThemeConfig, ErrorCauseBoundary} from '@docusaurus/theme-common';
import {
  splitNavbarItems,
  useNavbarMobileSidebar,
} from '@docusaurus/theme-common/internal';
import NavbarItem, {type Props as NavbarItemConfig} from '@theme/NavbarItem';
import NavbarColorModeToggle from '@theme/Navbar/ColorModeToggle';
import SearchBar from '@theme/SearchBar';
import NavbarMobileSidebarToggle from '@theme/Navbar/MobileSidebar/Toggle';
import NavbarLogo from '@theme/Navbar/Logo';
import NavbarSearch from '@theme/Navbar/Search';

import styles from './styles.module.css';

function useNavbarItems() {
  // TODO temporary casting until ThemeConfig type is improved
  return useThemeConfig().navbar.items as NavbarItemConfig[];
}

function NavbarItems({items}: {items: NavbarItemConfig[]}): JSX.Element {
  return (
    <>
      {items.map((item, i) => (
        <ErrorCauseBoundary
          key={i}
          onError={(error) =>
            new Error(
              `A theme navbar item failed to render.
Please double-check the following navbar item (themeConfig.navbar.items) of your Docusaurus config:
${JSON.stringify(item, null, 2)}`,
              {cause: error},
            )
          }>
          <NavbarItem {...item} />
        </ErrorCauseBoundary>
      ))}
    </>
  );
}

function NavbarContentLayout({
  left,
  right,
  center,
}: {
  left: ReactNode;
  right: ReactNode;
  center: ReactNode;
}) {
  return (
    <div className="navbar__inner">
      <div className="navbar__items">{left}</div>
      <div className="navbar__items navbar__items--center">{center}</div>
      <div className="navbar__items navbar__items--right">{right}</div>
    </div>
  );
}

export default function NavbarContent(): JSX.Element {
  const mobileSidebar = useNavbarMobileSidebar();

  const items = useNavbarItems();
  const [leftItems, rightItems] = splitNavbarItems(items);

  const searchBarItem = items.find((item) => item.type === 'search');

  return (
    <NavbarContentLayout
      left={
        // TODO stop hardcoding items?
        <>
          {!mobileSidebar.disabled && <NavbarMobileSidebarToggle />}
          {/* <NavbarLogo /> */}
          <NavbarItems items={leftItems} />
        </>
      }
      center={<NavbarLogo />}
      right={
        // TODO stop hardcoding items?
        // Ask the user to add the respective navbar items => more flexible
        <>
          <NavbarItems items={rightItems} />
          <NavbarColorModeToggle className={styles.colorModeToggle} />
          {!searchBarItem && (
            <NavbarSearch>
              <SearchBar />
            </NavbarSearch>
          )}
        </>
      }
    />
  );
}
導航欄顏色
導航欄樣式除了原本預設,可以更改為dark和primary(primary是基於src/css/custom.css中--ifm-color-primary的顏色,即設定的網站主色,更改primary顏色請參考網站色彩)。
primary
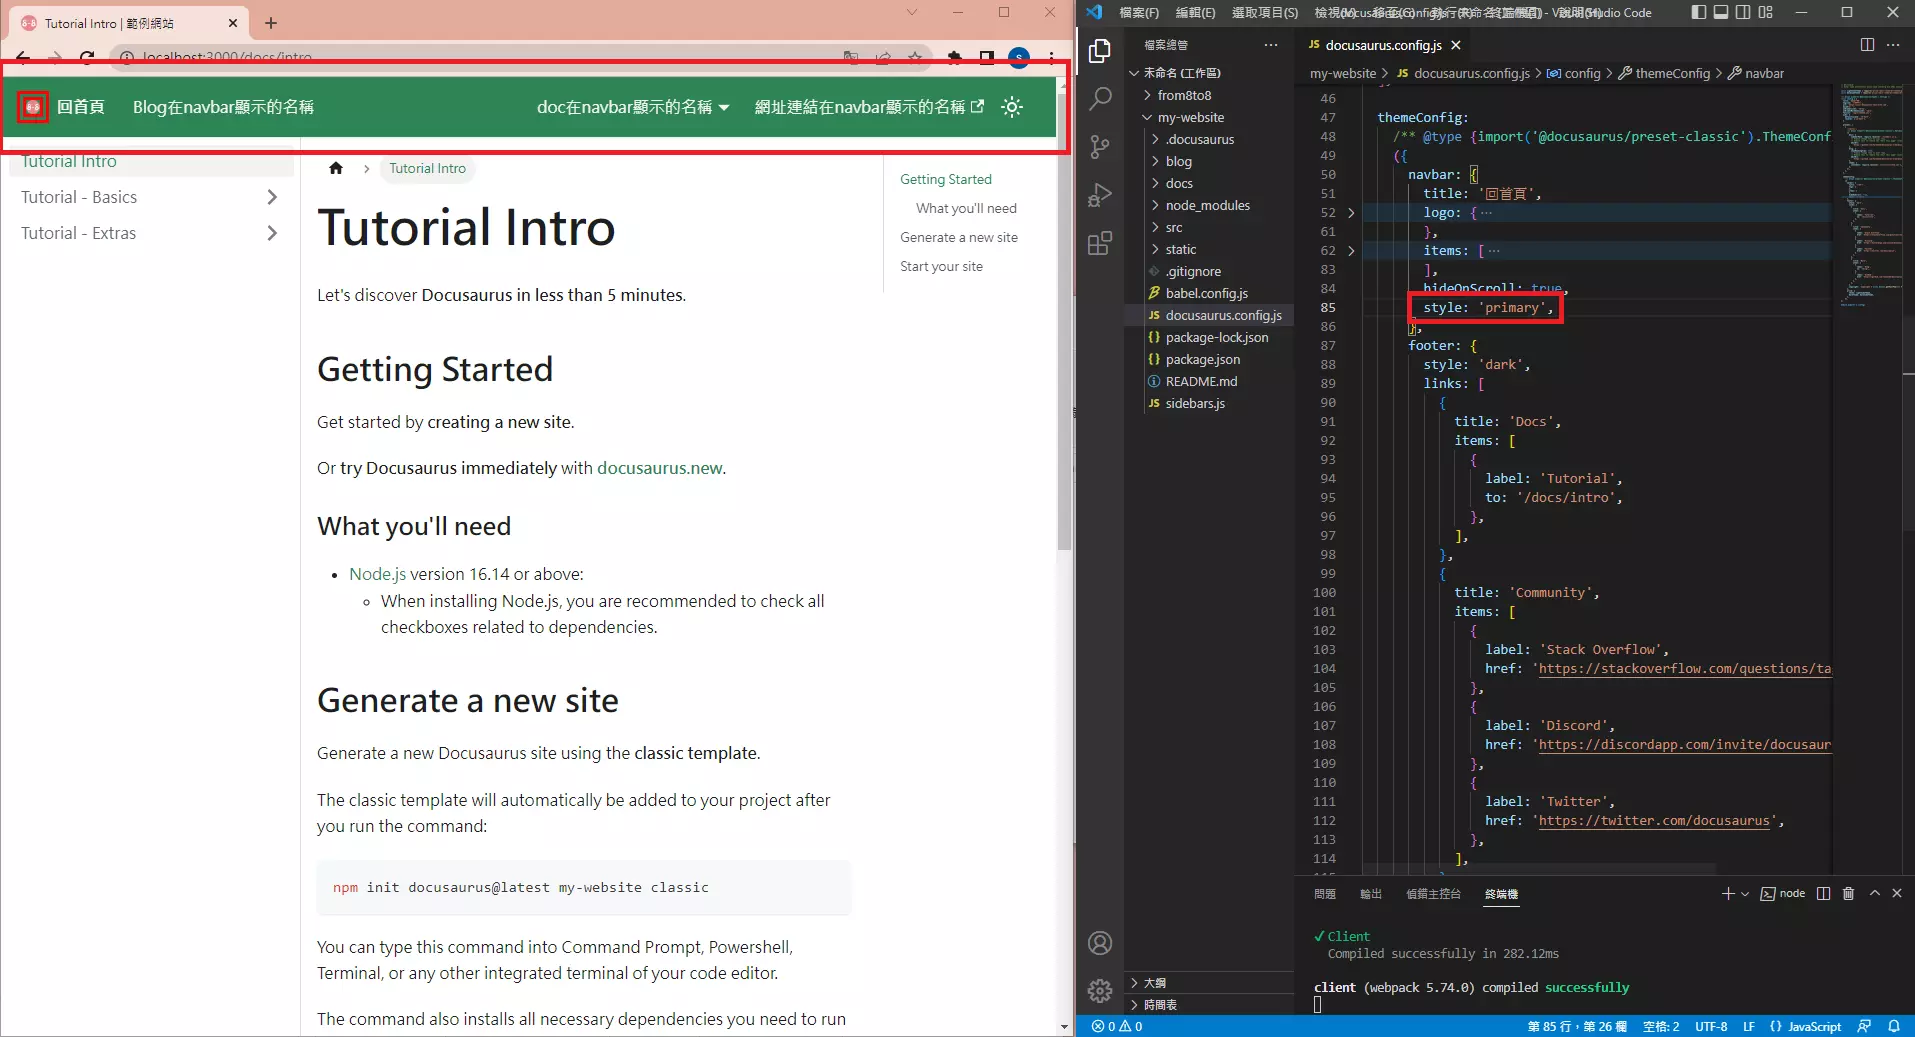
  themeConfig:
    ({
      navbar: {
        title: '回首頁',
        logo: {...},
        items: [...],
        style: 'primary',
      },
    }),
dark
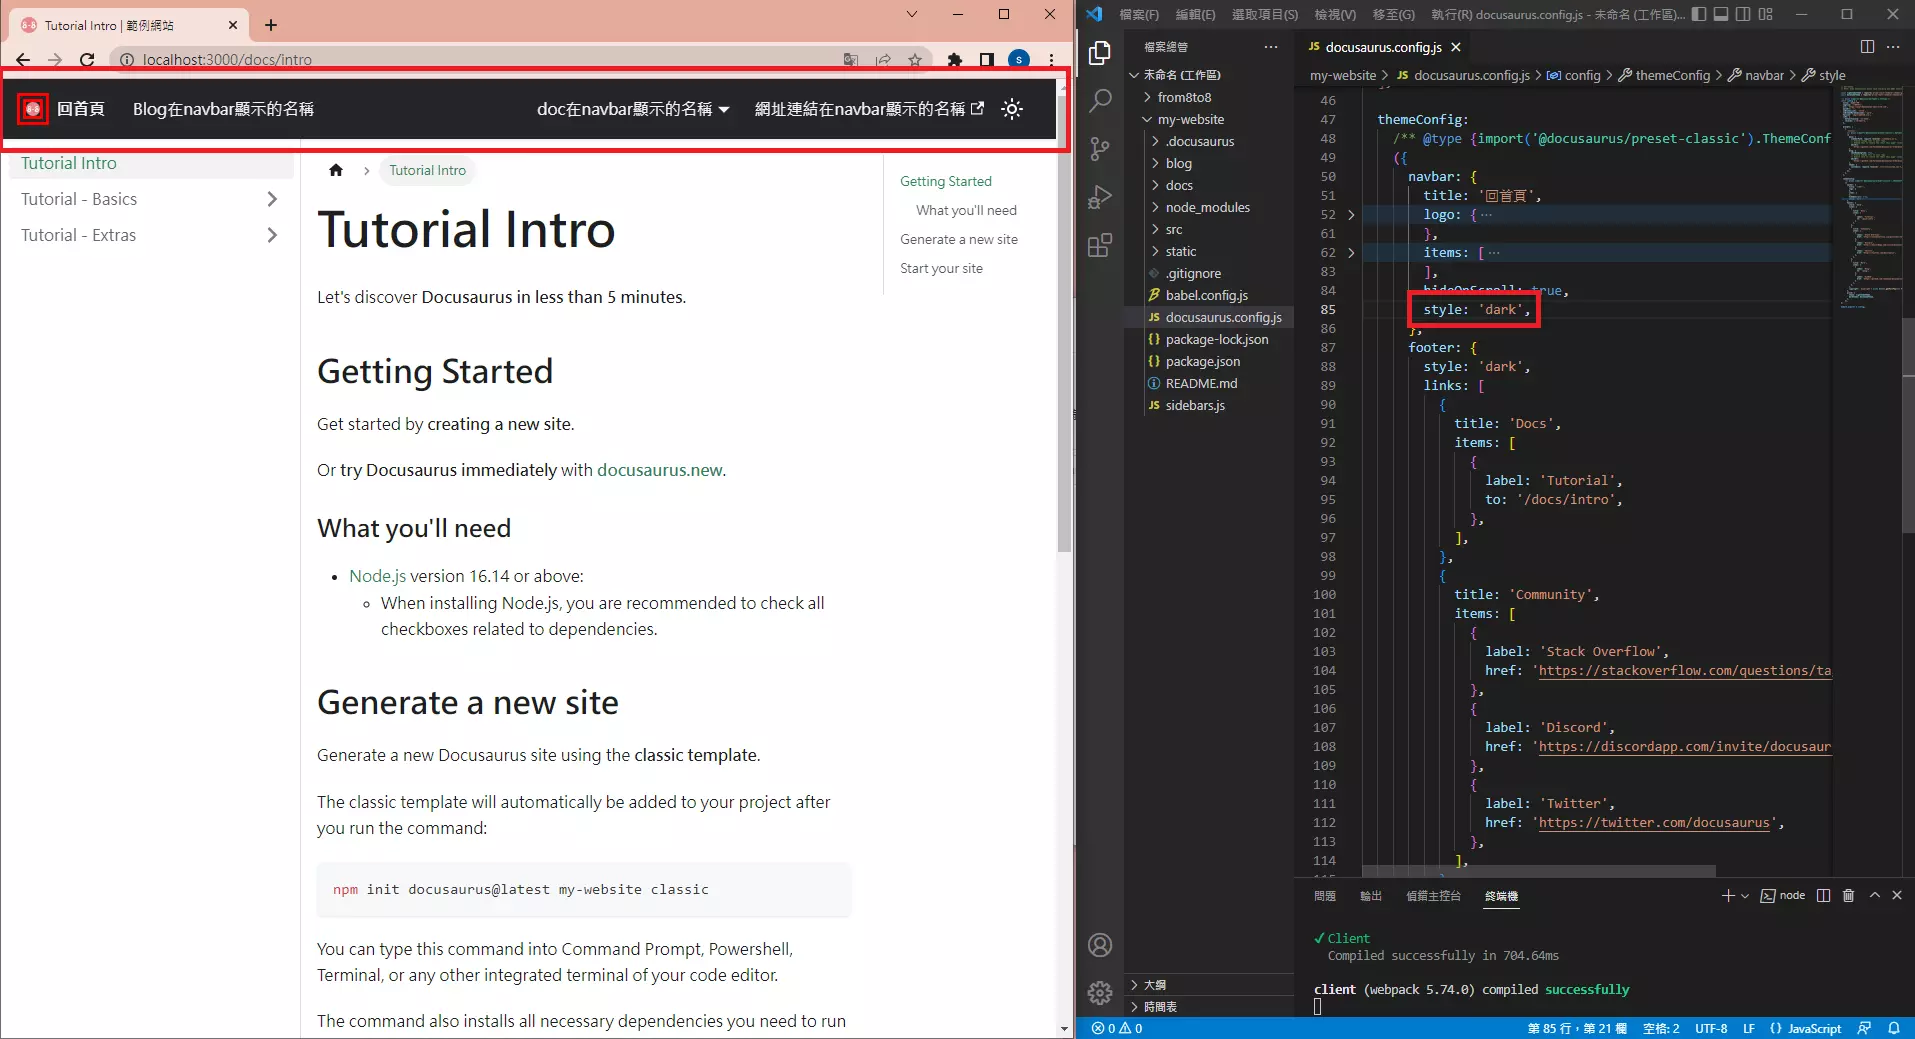
  themeConfig:
    ({
      navbar: {
        title: '回首頁',
        logo: {...},
        items: [...],
        style: 'dark',
      },
    }),
自訂
如果原本預設、dark和primary都不喜歡,就直接改成自己喜歡的顏色。
.navbar{
  background-color: transparent;
}
導航欄高度
:root {
  --ifm-navbar-height: 4rem;
}
其他更詳細內容請看官網教學。